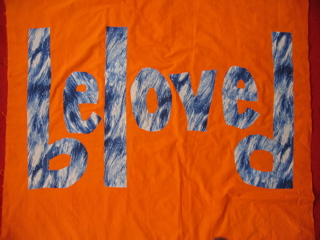
How do I get this going in my area?
So, this one is for Vicky and Bruce who posted the question. First off, please contact me! pascha[at]pfactory.org and we can discuss further! Secondly, the easiest thing to do is to start with a group of friends, a bunch of fabric, some scissors, pencils, and some steam-a-seam-2. Make 40"x40" squares of fabric. This will be your "canvas." Then cut yourself templates for each of the letters: B-E-L-O-V-E-D. Caps and/or lowercase- font is up to you. We have several different fonts at this point. Make your letters large so that they're very legible from a distance. I recommend having your letters be at least 12" tall and 8" wide. Then trace your template letters onto the Steam-a-Seam-2 (you can get this at your local fabric store). Then cut out your Steam-a-Seam-2 letters. Peel off the front of the letter paper. Then stick that to the back of the fabric you want to make that letter. Cut out the letter cutting both the fabric, and outermost millimeter of paper. Then peel off the back of the steam-a-seam-2 paper and place the letter onto your square. Once you've put all of your letters onto the square, iron them on. Once you've done this, you can sew around the letters (using a zig-zag or satin stitch) on your sewing machine to make the letters permanently attached. This will be the center square of your quilt. Then surround your quilt with fabric- this is where you can be as creative or as simple as you'd like. Sew this fabric around the quilt until you have a 60"x90" rectangle. Then attach this front to a back of some sort. Our backs are made of fleece- and I recommend fleece as it's very warm, dries quickly, and resistant to dirt. Once it's attached to a back, you can edge it with trim if you'd like- or edge & secure it the best way you know how. I hope this helps! Once again, please contact me. There are so many aspects to getting started- but I really think just gathering supplies and people and making 1 is the best way to get going.


0 Comments:
Post a Comment
<< Home